This blog describes my journey exploring storytelling - words, images and the sensations they generate. The lot, basically.
Showing posts with label Hardsurface. Show all posts

Wednesday, July 29, 2015

Production Proven Shortcuts: Display Borders in Maya

Ever been handed an asset looking something like this?


The Gouraud shading obviously gives away, that there is something not quite right with the mesh. We got a funny border running along some of the faces on the sphere.


Outliner shows us that the sphere is indeed a single mesh, not a combination of intersecting meshes... 
  
Hmmm. What is your next step for trouble shooting this?

I would normally make sure all the normals are softened. Differences in normals across the surface make such edges in the Gouraud shading, and it is quite a common problem.

So we select all the faces and pick Soften Edge under the Normals menu.


No joy still. Now, may I introduce you to the humble check box for Display Borders (under Mesh Component Display in the Attribute Editor)?


Checking that (and setting the value higher than the default 1), will immediately show any borders in the mesh. In this case, we see that the problem is that our geometry has been combined by two pieces of geometry fitting each other perfectly.

Maybe these parts of the geometry once came from the same mesh, was separated for various reasons and then combined back together.

In any case, we have double vertices along the (now) visible border. So instead of it being a problem with normals, it is a vertex problem, which we can fix by merging the vertices sitting in the same space.

Anyway...

Since the Display Borders option is so fast and simple, I will push that a step higher up on my list of trouble shooting steps, before I start checking normals. This little corner of Maya was pointed out to me by a colleague, after I had been swearing fruitlessly at the normals for an hour.

Nifty to cut a few corners.


Did you find this useful? Leave me a comment, share the post via your favourite social media or drop me an email about things you'd like to see covered.

Thursday, January 16, 2014

MARI: Distressed painted metal texture from scratch - Part 3

"Start with what is known, and what is hidden will be revealed."  - Rembrandt van Rijn


We'll take Rembrandt's wisdom and the approach of building up our textures layer by layer in order create the last of the secondary maps (bump) we need for the jerry can. For the first part of this tutorial, which looks at the diffuse colour maps for our jerry can, please go to http://marquepierre.blogspot.co.uk/2013/10/mari-distressed-painted-metal-from.html and for the second part, which covers the spec maps, please see http://marquepierre.blogspot.co.uk/2013/12/mari-distressed-painted-metal-texture.html.

Imperfection is key to successfully achieving the ilusion of realism and avoiding that computer generated look, and as such wear and tear is an important consideration for a texture artist. Which brings us to the bump maps. When people use the word "texture" outside of CGI, the meaning they refer to is pretty much what we use a bump map to illustrate: The texture of a surface, in terms of bumpiness, roughness and other smaller topographic details in the surface. The bump map adds lovely details, which are mostly only visible when the object is fairly close to the camera. It helps us to break up specular highlights and many other things. In a bump map 50% grey means that the surface is smooth and has neither indentations nor protrusions. White means details that protrudes out from the surface and black of course means details are recesses upon the surface.


Anyway, let's put together the bump map for the jerry can, using what we already have of information in the diffuse map.

To this end duplicate the Diffuse channel and use the duplicate for our bump map. In the Channel palette, right click on the Diffuse channel. Select Copy from the menu. Right click in the empty space on the Channel palette and select Paste from the menu. Now we have a duplicate of the Diffuse channel. Double-click on the new channel named "Diffuse Copy" and rename it to something suitable, like Bump or BMP.

First things first. When I paint secondary maps I set my Mari viewport to 50 percent grey. This allows me to visually gauge how far I am from my 50 percent grey midpoint. Beats bringing out the Color Picker all the time (although that certainly is useful to double-check values with). So right click on any empty and unused part of your Mari viewport. Select Display Properties.
 Under Display Properties, under Background we have two colour swatches, which combined can create a gradient in the background of your viewport. Click each of them (Top and Bottom) and select a 50% grey, and hit Ok.

If you work in flat lighting mode (F1) then you will always be able to quickly compare the values of your bump map against the even grey background of the viewport. 
Building our layers, we want to work from a 50% grey bottom layer - which in a bump map would represent a perfectly even surface. That wil be our starting point, upon which we will add dents, scratches and all the other goodness a bump map allows us to portray. So start by adding a Procedural Layer - Basic - Color and set it to 50% grey. 

So a 50% grey object set on a similarly coloured background, and your viewport should look like the right side (the flat lighting) of this image:

Let's start adding in our details from the creation of our colour map.

The first thing we want to use is the paint on the metal. That paint would sit slightly higher than the underlying metal itself. More specifically, as the green paint layer was a procedural basic color layer masked out in places, we need to use the mask. So right click on the mask symbol and then Layer Mask - Make Mask Stack. This turns our mask into a proper layer, which we can copy and add other layers to in a regular layer stack style.

Also it changes the icon from the mask icon to the mask stack icon:


Now, if you click on the new mask stack icon, a new layer window will open. Select the layer there in and copy it  (right clicking on it, will give you a copy, paste etc. menu). Paste it into our bump channel above the 50% grey procedural colour layer. Create a layer group for it and drag our mask layer into the group. Now change the blend mode for the layer group to Multiply and the opacity to something like that 0.3. This is what my bump map looks like so far:

In summary, what we have done here is creating a difference in height between the paint on the can and the aluminum underneath. Notice that the rubber spout is darker all over. This comes from our original mask, which of course masked away the paint from the rubber spout. In any case, we can leave it for now, as bumps very much work off differences in values. Globally on the spout we right now have a darker value, but the values of the details we will add on top of this darker value will still have the correct differences anyway. Kinda like adding 2 to 0 or 2 to 2, both will give a value which has increased with 2. That is how I see it. Does that make sense?

Moving on...

Move your aluminum base layer to sit on top of what we have so far. Change the blend mode to Overlay and the opacity to something like 0.25. What that does it gently add a bit of variation to our jerry can. Obviously a used jerry can is not completely smooth even on the big swathes of painted metal. We need to break those surfaces up ever so slightly, and preferably in an organic way. Our aluminum base will do this nicely.

Just as we want to break up the even spaces on the metal, so we also need to add a bit of similar detail to our rubber spout. Let's see what we can reuse of existing layers on the spout.

Your rubber base and rubber detail layers could be useful here. I took the rubber base layer and changed the blendmode to Multiply and lowered the opacity all the way down to 0.043. The rubber details layer I used with the blendmode of Color Dodge and an opacity of 0.07. So only adding these details in very, very lightly, but enough to break up the rubber spout, so it will not look like smooth porcelain etc. Here is what I got so far:


Remember our general dirt layer? We used a nice concrete texture to help paint it. As an object becomes dirty, that dirt will also add to the shape or roughness of the object. Drive your shiny new car through a muddy field, and what was previously smooth painted metal will now have bumpy mud on it. On a much smaller scale, we will use that dirt layer to add the bumps corresponding to the information in the colour map. Of this needs to be on a very small scale. Turn on that dirt layer and change the blend mode to Hard Light (as we want both the light and the dark information). I dialed my opacity all the way down to 0.043. You can barely see these details with the naked eye (unless you got a swanky 4K monitor), but with bump maps, little scratches can quickly end up looking like massive gouges in the render, so subtlety is imperative. Here is my bump map at this point:

Speaking of bump maps and scratches, let's move on to this more meaty subject. For the scratches on the can, I want to both use the general scratches we painted and also use a higher contrast version of those. With the higher contrast scratches I want to create a smaller number of more pronounced scratches. So we need to copy our scratches layer and place it in a new layer group. Add on top of the scratches layer in there an adjustment layer - contrast. Adjust your contrast to fit. Here are my scratches post contrast adjustment on their own:


Then change the blend mode of the layer group to Soft Light and the opacity to something like 0.2. Put together with the other layers, this is what it should look like:

That is a nice subtle start to our scratches. Let's turn it up a notch. So if we go back to our original scratch layer, here we will get the majority of the information, which will drive our scratches' bumps. To make sure the bigger details of the texture come out, I changed the blend mode to Hard Mix and took the opacity down to 0.3. In close up, it looks like this:
 
 All told, this is my jerry can so far:

Let's bring in the rust details. Make a layer group for your rust layer, and add an adjustment layer - HSV on top, crank the saturation down to 0. Or you could also add an adjustment layer - Luminosity, which does the same job, or if you are an enemy of non-destructive editing, you could run a filter on your rust layer (Hue or Luminosity for example). You get the point... So with our rust detail all converted to greyscale, change the blend mode of the rust layer group to Color Burn and the opacity to something like 0.236. Now our rust details will have a suitably bumpy surface.
 

Actually. I am still not happy with the way the rust is portrayed bump-wise. I want something more grainy. Rust has that crystalized kind of surface. I am thinking, generate some noise and overlay with the rust bumps we already have to get that grainy feel. Create a layer group and add a procedural layer - Noise - Cellular. Depending on your overall rust look, the noise needs to be quite small. 

Add a layer mask to the rust noise detail layer group and set it to hide all. What I did next was to take a rust texture and using the paint through tool and an organic brush, I painted into the mask where I wanted this noise detail on top of my rust. Here is what I painted onto my layer mask:
Change the blend mode of the layer group to Multiply and take the opacity down to something like 0.227. Up close you can see (compare with the rust bump close up above) the added detail provided by the noise layer:


That takes my bump map to its final stage:

Which rendered out, contributed to this look:


In my final instalment of this mini-series, I will go over setting up our shaders and lighting. Then I am looking forward to seeing your renders of this simple Mari texturing project.


Did you find this useful? Leave me a comment, share the post via your favourite social media or drop me an email about things you'd like to see covered.


Friday, December 13, 2013

MARI: Distressed painted metal texture from scratch - Part 2

"Start with what is known, and what is hidden will be revealed."  - Rembrandt van Rijn


We'll take Rembrandt's wisdom and the approach of building up our textures layer by layer in order create the secondary maps (bump and specular) we need for the jerry can. For the first part of this tutorial, which looks at the diffuse colour maps for our jerry can, please go to http://marquepierre.blogspot.co.uk/2013/10/mari-distressed-painted-metal-from.html

The spec map is often considered the most-valuable-player of all the texture maps. When objects are so far away from the camera, that the diffuse map cannot be made out anymore, you can usually still see the effects of the spec map. The opposite end of that spectrum would probably be bump maps, which are the first to go as the camera pulls away from a model. The spec map will simply put control how shiny our object appears; how much of the light that hits the object is reflected back. Black equals the light-eating power of a black hole, where white equals the mirror shine of chrome.

Anyway, let's start putting together the spec map for the jerry can, using what we already have of information in the diffuse map.

To this end we will duplicate the Diffuse channel and use the duplicate for our spec map. In the Channel palette, right click on the Diffuse channel. Select Copy from the menu. Right click in the empty space on the Channel palette and select Paste from the menu. Now we have a duplicate of the Diffuse channel. Double-click on the new channel named "Diffuse Copy" and rename it to something suitable, like Spec.


In the Layers palette for the new Spec channel, add an HSV adjustment layer as the top-most layer of the stack. Take saturation slider all the way down to 0, and now our duplicated diffuse channel is all greyscale as a spec map needs to be.Turn off the visibility (click on the little eyeball icon next to each layer) of all the layers in the channel, and then we will bring them in as need be.

Add a procedural layer (Basic - Color), set the colour to black (don't use complete black, or white in your textures, it messes up the shader math); put 0.114 in each of the RGB channels.

This "black" will be a base for the rubber spout of the jerry can. So why don't you add an empty layer group and drag the procedural color layer into the group. Add a layer mask to the group by selecting the group, right clicking on it and selecting layer mask - add mask. Whether you go for Reveal All or Hide All, paint with pure white or black in your layer mask, so only the spout is affected by the procedural color layer. For good measure, I have added a white color layer underneath to help our spout to stand out.

Other than the procedural layer with the black colour, which we have just inserted at the bottom, your lowest layer should be your aluminum base layer. We need that. Click on the eyeball left of the layer in the layers palette to toggle its visibility on. The aluminum texture will both give a nice neutral base to build upon as well as lot of organic details and variation, which suits a metal can. So far, so good.


Next I want to add a touch of ambient occlusion. In corners dirt and dust will gather automatically due to inaccesability, which makes it more unlikely to get wiped off by regular use. Most kinds of ordinary dust and dirt will lower the shininess of a surface, so using ambient occlusion to make these areas darker works well (darker is less reflective or shiny in our spec map, mind you). A tiny touch will do.

Click on the Add Procedural Layer button in the layers palette. Select Geometry - Ambient Occlusion. Set the blend mode of the layer to Multiply and the opacity to 0.150. If you don't have something like this...


... it might be because you haven't calculated your ambient occlusion yet. In that case, select your jerry can as an object. Go to the Objects menu and select Ambient Occlusion. Mari will calculate for a while, and then you will have your lovely ambient occlusion.

Remember your Dirt layer? Turn that back on (click on the eyeball to the left of the layer name). This is what I have:


Next we want to bring the scratches back into play. If memory serves, the scratches layer from the diffuse map was set to Hard Light blend mode and 0.798 opacity. That should do nicely for the purpose of the spec map as well, so turn the layer's visibility back on.


The spills we added from down the front from the spout and to the base of the can also need to be in the spec map. However, they were set to Vivid Light blend mode before and 0.552 opacity. Change the blend mode of the Spills layer to Overlay and crank the opacity up to 1.0. Which should look something like this.
Lovely.

Onto our Dust_broad group. Therein we painted a broad and generic dust layer, masked by Ambient Occlusion. Turn the visibility of the Dust_broad layer group on. We should be able to use the blend mode (Overlay) and opacity as is. So far, so good:


We also have the Dust_detail layer group, where we added more specific dust around the base of the spout etc. Turn on the visibility of the Dust_detail layer group and make sure the blend mode is set to Overlay and full opacity.


I am looking at our spec map and I would like the scratches to be more pronounced. As light moves across the jerry can, the scratches would be a very distinctive feature. Aluminum has a dull glow, as the surface is oxidized over time, also you have the paint, which obscures metal, but where the scratches are, the aluminum will be naked and in some places freshly scratched - revealing the full extent of its shininess in places. Copy the Scratches layer (Right click on the Scratches layer and select Copy and then right click again and select Paste). We still want all the light and dark information of those scratches cranked up to full effect, so blend mode should still be Hard Light. I further took the opacity up to a full 1.0. 


So that is the scratches. How about rust? How does rust affect specularity? In my experience, rust dramatically dulls the reflectivity of metal. What is least shiny thing you know? From where I am sitting, the carpet underneath my feet has next to no reflection. Rust is pretty close to that. Do a quick google search for rust and you will see that there are a lot of different types of rust, which again would mean a lot of different looks of rust. Of course it not completely diffuse, but close, and so we aim for darkness where we have our rusty patches.

Our rust layer was set to multiply. Turn on the visibility and crank up the darkness it leaves by changing blend mode to Color Burn. It should look something like this...


Zooming close in on the rust, I love the grainy details. Rust is never very even in its colour, density and distribution. That should correspond nicely with the crystalline quality of the surface of rust.


The very last addition to our spec map will be our grime layer. Turn the visibility of the Grime group on and change the blend mode to Color Burn. I want this layer group to help create break-up and variation of the larger metal surfaces, so we need Color Burn's increase of contrast to help with that. Change the opacity to something in the range of 0.25, which gives us our finished spec map:


Now that we are done, going back over the project, a few things could be improved. Perhaps we could add just a touch of noise to the rubber spout base, to further break up the base (apart from what we have done with the layers of dirt, dust etc.). We could also make a differentiation between the exposed metal and the painted metal.

In general it is worth noting most, if not all, of what you need for your spec map, you should already have in some shape or form in your diffuse (colour) map. Also, a spec maps best friend is variation. So if you have large stretches of the same material on your geometry, make sure you consciously look to break it up in your spec map. Unless your object is fresh from the factory, this is a really key point. On a show I worked on, we had a number of spaceships, which needed to appear relatively clean and sci-fi'ey, but as a result the colour maps were struggling a bit to convey the needed realism - solution? Quietly make your spec maps absolutely filthy...
 
What is left now, is just to create a bump map and setting up our shaders and lighting. That will be the topic of the last two posts in this mini-series. Then you should have a render looking more or less like mine:


This tutorial continues with an overview of creating a bump map for our jerry can here.
Did you find this useful? Leave me a comment, share the post via your favourite social media or drop me an email about things you'd like to see covered.

Wednesday, October 09, 2013

MARI: Distressed painted metal texture from scratch - Part 1

"Start with what is known, and what is hidden will be revealed."  - Rembrandt van Rijn


That right there, is pretty much my artistic modus operandi. You may not know all the steps needed to achieve a finished look, or indeed very many of them, but start with what you know, and what is still needed, will become clearer and clearer as you go. 

Pretty much what the flexibility of a layer system allows us to do - adding in different ingredients in various amounts till you have the desired look.

Mari started out with a "layers" style system back in the day, where layers were called "channels", but still had blend modes, opacity and masking options, just as we know layers originally from Photoshop (Layers were introduced in 1994 in Photoshop 3.0). From Mari 2.0 and onwards layers are indeed called layers, and channels now refer to something different. My example file here was originally made with Mari 1.5, so please excuse the slightly different interface. The layer system in Mari 2.0 now more than matches what Photoshop can offer on that feature - particularly for texture painters! Layers in Mari now is chokeful of goodness like procedurals, adjustments of all kinds and masks, which can be small layer stacks themselves. Add to that one of my favourite features: Advanced Blend Modes!

But for this demonstration, the basic functionality of the layers setup will do sufficiently.

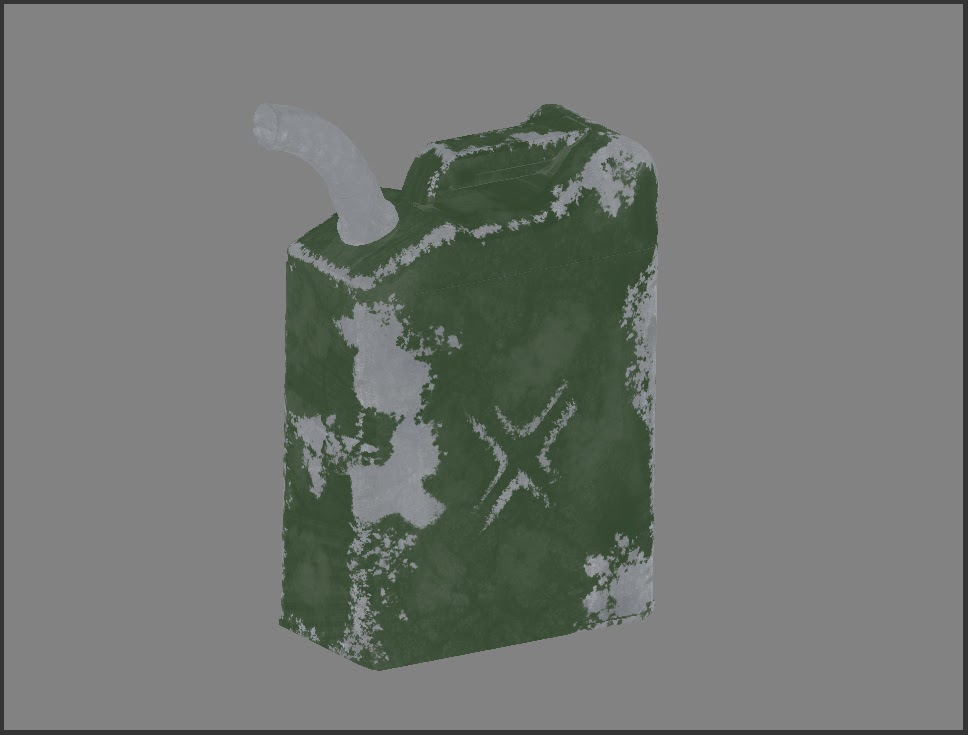
The subject here is an old jerrycan. This gives us the distinctively differement materials painted metal and a rubber hose to play with. I found it modelled and UV'ed nicely on CGTrader. Go grab your own if you want to follow along in this little paint by numbers session.


When I am painting hardsurface textures, I know there are a lot of material properties which will be common to most objects. Obviously there will be a surface colour (maybe it is a paint layer); maybe some of that will have been scratched off to reveal the material underneath (in this case a metal like aluminum or steel); If the paint has been in contact with strong sunlight, it will be bleached and lose saturation and increase in value; The paint can have been applied unevenly, resulting in differences and small details in the paint layer; Depending on the type of object, it can have any number of different types of stains; Ordinary dirt will gather in corners, scratches and other places; Dust will also gather where the object is not regularly touched, and in places where it will stick to a liquid for example.

This is by no means an exhaustive list, but as you consider an object, think carefully about how it has been made, how it is being used, where it lives and what substances it gets in touch with on a regular basis - and how each of those affect its colour, shine, bumpiness and other attributes. I literally write down a list of attributes and cross them off as I go. If I am at a loss to where to take an asset, when I start, when I have ticked off all of the attributes on my list, I will either be finished or have a very, very good idea of what last few steps are needed to take me home. Which is basically what the Rembrandt quote above means.

As this is a wellworn painted jerrycan, we'll start with an aluminum base. I used this aluminum base texture from CGTextures:


This particular aluminum texture deserves some kind of Most Valuable Player award. I have come across it in many, many texture artists' Image Manager. Even if it doesn't tile, it a very useful image. It has enough details to make it interesting and not enough strong details to make it jarring. As it is a white metal, it can be used as a base for a lot of different metals. And finally it resides on the very popular site CGTextures.

So my bottommost layer consists of this aluminum base. In UV view I did a quick Paint Through job with Repeat turned on to cover the entire object. Then I painted out the seams in Ortho view - also using the Paint Through tool and our chosen aluminum texture. So far, so good:

Next we need some paint on our model. Add a procedural layer with a Color Constant. Pick a suitable colour for your paint (I went with an olive drab green). A word of caution here: In our minds colours are always more saturated than they actually are. You may think that a fire engine is perfectly red, with 100% saturation. I dare you, grab a photo of such a fire engine and sample the colour with your Color Picker. See? Not even close.

Right click on your layer and add a Layer Mask for the selected layer, which you set to Reveal All. Now with the Layer Mask selected still, choose the Paint tool, set your paint colour to black and pick a suitably organic brush to paint scratches with. You want to paint in all the places where the paint has worn off the can (as well as the rubber hose, where no paint should be found). Picking a suitable brush - or combinations of brushes - is half the work. To help you get that flaky look of peeling paint, you could enlist the services of the brilliant Fractal Noise Mask. Find it under the Projection palette. First tick Mask Preview Enabled in Projection Settings, so you can see what your settings will look like before you start painting. 


Then turn on Fractal Noise Mask a bit further down, crank the Mask Amount up to 1.0 and set the size to something suitably small like 0.059 or smaller still. Feel free to play with the Roughness and the other settings till you have a look you like.

When you now start painting in the places where the paint has been worn off, please consider the use and shape of the jerrycan: Where will it be worn the most? Feel free to carefully study old jerrycans with a Google image search. Here is my can. Maybe a tad overdone in places.


But green paint doesn't stay exactly the same shade of green for very long. We need to get some different details into the green paint to make it more believable; Break it up and create some variation.  So pick the colour of your paint and change its value and saturation a bit. Grab your Paint tool and pick a good broken up and organic brush. I used primarily the Iguanadon brush (under Brad's New Brushes when you hit K). But you want to use a few different brushes at reduced opacities to make sure we don't get too obvious patterns. This is what I have (flat lighting):

 And with full lighting:
I should mention that when I painted this in Mari 1.5, I used the Layer Mask controlling where the green paint goes to also control what parts could have the added green paint variation, by inverting it. With Mari 2.0 (and beyond) a much more elegant and neat way of doing all of that is to place these two green paint layers in a Group and then put the Layer Mask on the Group. That Layer Mask is the one where you paint in where the paint has chipped off the jerrycan.

While we are still detailing the paint work of the jerrycan, why not paint in a decal to both give it some visual interest and further tell the story that this is a military object. I prepared a few stencil style decals in another paint package:
Notice the blurred edges. If these stencils are being sprayed on in a quick and dirty fashion, no way would that spray paint be sharp and crisp on the edges.

Stamping the decal images with the Paint Through tool onto a layer above the green paint layers is very simple. But as a former Lead of mine always used to say, 'you have to work in your brush strokes!' What that means is, it would ruin the illusion if we just let these stencils sit undisturbed on top of the paint layers. That layer of spray paint would start getting worn away very quickly - if it even was 100% opacity to begin with. So use the Paint tool, set the Painting Mode to Clear (or if you want the gold star for non-destructive workflow do so by giving the Layer a Layer Mask and painting into that with black) and pick a soft brush with low opacity. Here are my decals after a little bit of work (in flat lighting and on a 50% grey background for clarity):


All told, that takes our layer stack up to something like this:
My next layer contains a mild bit of Ambient Occlusion (AO). This I use to simulate the dirt which imperceptibly will gather in cracks and corners on an object like this. I don't expect a jerrycan would be treated with much care and attention. If used for gasoline or oil it would probably never be washed carefully. So dirt will gather in cracks, where the general actions of use and wear will not remove it. 

Generally, you want to be careful with Ambient Occlusion in your textures, as it bakes in lighting information into the textures - which really should be the domain of the shader and lighting to add such details. But in reality, you do find a small number of instances where texture artists (and lighters for that matter) talk about "helping the shader along" with things like Ambient Occlusion and painting lighter edges on assets for example. But perhaps that is a topic for a different day. For now, let's just state that Ambient Occlusion rendered out as masks can be massively helpful for a number of things.

To generate Ambient Occlusion for use in your textures, select your object (if you don't already have it selected), go to the Objects menu and select Ambient Occlusion. This will get Mari to start calculating the Ambient Occlusion. Then add a procedural layer (Geometry - Ambient Occlusion) and change the blend mode to Multiply and opacity to something like 0.350. If you want a gold star, throw on a Layer Mask and break up the AO to add variety.

This is what my layer stack looks like so far (with flat lighting):

And with full lighting:
Before we go any further with the can itselft, we really need to do give the rubber hose some care and attention. Select the rubber hose part of the jerrycan with your Select tool set to Faces (you can use Smart Selection Mode if you like, but due to the way this model has its UVs laid out, you will not get all of the faces in one go). Add another layer for the base of the rubber hose. Fill that layer with a dark grey (You never want to use complete black nor complete white, as they mess up shader math. I am no shader mathematician, but think about it, how do you multiply with either 0 or 1 - if the range of the possible results can only be between 0 and 1? Those values are no good.). I used 0.234 0.228 0.215 (RGB values):

Too flat. We need some detail in there. Pick a lighter colour (I used 0.153 0.156 0.157 in RGB values), and with your Paint tool and a nice broken up brush (could be crackSplat from the Hard Surface Brushes tab) set on low opacity (0.3 or there abouts) add in some variation to our rubber base. The aim is variation in the colour along the lines of a mottled pattern:

Better. Now let's use the wonderfully organic pattern of the aluminum base underneath. Change the blend mode of your rubber base layer to Multiply. Okay, that is looking decidedly a lot more like a black rubber hose:

But we can do better still. We need more detail to sell the look of rubber. Add another layer to sit above the rubber base. Grab yourself a concrete texture from CGTextures or Texture Pilot. Then using the Paint Through tool and a broken up brush (like crackSplat) to paint some of the concrete onto your layer like this:
Now change the blend mode of your rubber details layer to Color Dodge and the opacity to something around 0.537. This is what my stack looks like so far:
That will do as a nice rubber base for now.

Remember that nice concrete texture from before? We need to employ that again to add some general dirt to our jerrycan. Add another layer and set the blend mode to Overlay and the opacity to something in the vicinity of 0.266 (these values are not set in stone, so feel free to play around with them, to match the concrete texture you are using and the look you are going for.). Now using the Paint Through tool and a brush like Linear (found under the Basic Brushes tab when you hit the hotkey K) use your concrete texture to paint more varied and detailed dirt onto your can. I should point out, as a matter of course, that you want to have your Edge Mask switched on, to avoid streaky paint on your edges (find it in your Projection palette):


This is what I have so far:


A little bit of dirty details, which sits nicely on top of the paint and decal layers.

This jerrycan is meant to have taken a fair bit of abuse. Metal like aluminum naturally gets scratched under such circumstances - particularly on the edges and corners of the object. Hunt down a couple of suitable metal scratch textures. This is what I used:

Adding a new layer on top of your layer stack, use the Paint Through tool to paint these beautiful scratches onto the edges of the model. Something along these lines (here set against a 50% grey background for the sake of clarity):
If we then change the blend mode of the Layer to Hard Light and lower the opacity to around 0.8 (I used 0.798 to be precise - but again that depends on the texture photos you have at your disposal and the look you want), the jerrycan should look like this:
So... how about all those exposed areas of metal? They would rust over time. We need some rust to add to the beauty of this object. Find yourself some suitable images to sample rust from. Here are mine:

Add a layer for your rust and give it a Layer Mask (set to Reveal All for now). Using the Paint Through tool paint the rust onto your can where the paint is peeled back and has exposed the metal underneath. You are only as good as your reference, so do have a look at how and where rust gathers on similar objects.
Should you wish to, you can paint into the Layer Mask to help fine tune the speckled look of rust. Finally, change the blend mode of your rust layer to Multiply, and you should have something looking along these lines:

What other details do we need? If this can is used for gasoline, it would be reasonable to imagine that some of the gasoline would spill and drip onto the can from time to time. Such a stain would again attract dust and other dirt, which would stick to the gasoline drips. Let's try and create a stain like that.

Add another layer for our spills. Find a suitable texture with streaky stains on. This is what I used:
 Nice organic streak details with variety in colour and value.

Using the Paint Through tool, paint in nice long streaks starting from where the rubber hose is attached to the spout. Change the blend mode of the layer to Vivid Light and your opacity to something that suits the spill texture. I have used an opacity of 0.552 in this image: 
Remember I mentioned that AO rendered out can be used advantageously for various masks? Now I want to add a subtle layer of dust to our can. For that I will need our AO inverted. Add a Group Layer. You could name the group Dust for example. Add another Group Layer and drag it inside the Dust group. This new Group you could name Dust_broad. Add an ordinary paint layer and drag it into the Dust_broad Group. Select the Dust Group and add a Layer Mask. Right click on the little Layer Mask icon (which should be glowing orange) find the Make Mask Stack command. This will change our little orange friend from a sphere inside of a square to three horizontal lines sitting in a neat little stack. If you again click that new icon, it will open up a palette with the mask as a layer stack. In that palette add a procedural layer (Geometry - Ambient Occlusion). If you have already calculated the AO, by selecting your model and then selecting Ambient Occlusion from the Objects menu, then you can skip this step. On top of the procedural AO layer, add an Adjustment Layer - Invert. Now we have a inverted AO as a mask. This specifically means that we have a mask, which will allow us to paint only in the crevices of the model. Exactly the place where dust collects over time. So pick a dust colour. I used a grey brown (RGB: 0.371 0.328 0.276). Select the Paint tool and pick a broken up brush like crackSplat or oldShipyard (under the Brad's New Brushes tab) and start painting in dust on your paint layer inside the Dust_broad group. With the help of the layer mask, you should have something like this:
If you change the blend mode of your Dust group to Overlay and the opacity of the Dust_broad group to around 0.570, you should have something like this:
So much for general dust. I still want to add some more specific dust where I know it would gather particularly: Inside the nooks and crannies in the handle, around the edge of the spout and the cross indentation on the side of the can for example. So add another paintable layer and another group layer. Rename the group layer to Dust_detail. Drag the paintable layer inside the Dust_detail group, and again drag the Dust_detail group inside the Dust group. Pick a dusty colour.
Grab your Paint tool and one of the broken up brushes I suggested before, lower the opacity of the brush to around 0.500 and start painting. Here is my dust layer:

I want to give it a slightly grainier look. I could have employed the Fractal Noise Mask set on a really small size for this, but instead I am going to use a filter. Filters menu - Add Noise. Don't tick the Grayscale box - we don't mind the extra bits of colour variation. Set the size to something suitably small like so:
 

Apply that filter to your Current Paint Target (which should be the dust layer you have selected). You should have something looking like this:
We are about done here. I still think that this beat up jerrycan could do with a bit more grime to match the level of abuse it has suffered in general. I think the green paint is still too even. Apart from the colour differences we put in earlier, paint will assimilate stains over time, which will bleed into the paint, changing the colour, value and saturation. I used this texture to add grime:
Add another paintable layer to your stack, add a group layer and drag your paintable layer into the group. We could rename this group to something like Grime. Roll out the trusty Paint Through tool. Cover your model with the texture, keeping in mind the size of the details relative to the size of the object. This is what my grime layer looked like:
Gold star for adding variety to the grime layer by a layer mask and painting a bit of variation opacity wise. In general I am happy with this layer. Only I wanted to take a bit of saturation out of the grime, so in my Grime Group, I have added an Adjustment Layer (HSV), which allows me to turn the saturation down a bit. Changing the blend mode of the Grime group to Overlay and the opacity to 0.650 gives us something like this:
Duly rendered out the jerrycan looks like this:
Naturally we still need to create a bump map and a spec map, but these secondary maps will be the topic for another post.

At the end of any project, it is worthwhile to look back and go over the steps you took. There is still a lot of things you could add to, or subtract from this colour map. Personally, I think I could have been more subtle with the peeled off paint; The green paint is maybe a tad oversaturated in places etc.

There are no revolutionary new techniques in this workflow; This is a pretty standard and straight forward bread and butter approach for a texture artist. But in order to return to Rembrandt, the powerful and flexible layer system of Mari, allows us to keep adding in details until everything has been revealed.

This tutorial continues with a look creating spec maps for our jerry can here.

Did you find this useful? Leave me a comment, share the post via your favourite social media or drop me an email about things you'd like to see covered.