"Start with what is known, and what is hidden will be revealed." - Rembrandt van Rijn
That right there, is pretty much my artistic modus operandi. You may not know all the steps needed to achieve a finished look, or indeed very many of them, but start with what you know, and what is still needed, will become clearer and clearer as you go.
Pretty much what the flexibility of a layer system allows us to do - adding in different ingredients in various amounts till you have the desired look.
Mari started out with a "layers" style system back in the day, where layers were called "channels", but still had blend modes, opacity and masking options, just as we know layers originally from Photoshop (Layers were introduced in 1994 in Photoshop 3.0). From Mari 2.0 and onwards layers are indeed called layers, and channels now refer to something different. My example file here was originally made with Mari 1.5, so please excuse the slightly different interface. The layer system in Mari 2.0 now more than matches what Photoshop can offer on that feature - particularly for texture painters! Layers in Mari now is chokeful of goodness like procedurals, adjustments of all kinds and masks, which can be small layer stacks themselves. Add to that one of my favourite features: Advanced Blend Modes!
But for this demonstration, the basic functionality of the layers setup will do sufficiently.
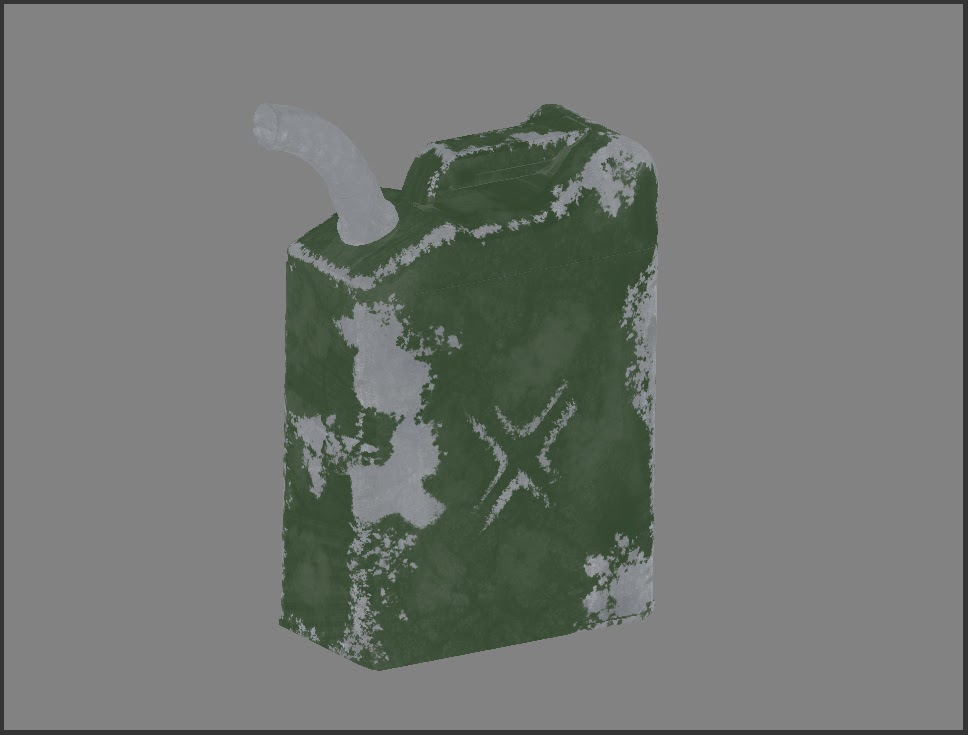
The subject here is an old jerrycan. This gives us the distinctively differement materials painted metal and a rubber hose to play with. I found it modelled and UV'ed nicely on CGTrader. Go grab your own if you want to follow along in this little paint by numbers session.

When I am painting hardsurface textures, I know there are a lot of material properties which will be common to most objects. Obviously there will be a surface colour (maybe it is a paint layer); maybe some of that will have been scratched off to reveal the material underneath (in this case a metal like aluminum or steel); If the paint has been in contact with strong sunlight, it will be bleached and lose saturation and increase in value; The paint can have been applied unevenly, resulting in differences and small details in the paint layer; Depending on the type of object, it can have any number of different types of stains; Ordinary dirt will gather in corners, scratches and other places; Dust will also gather where the object is not regularly touched, and in places where it will stick to a liquid for example.
This is by no means an exhaustive list, but as you consider an object, think carefully about how it has been made, how it is being used, where it lives and what substances it gets in touch with on a regular basis - and how each of those affect its colour, shine, bumpiness and other attributes. I literally write down a list of attributes and cross them off as I go. If I am at a loss to where to take an asset, when I start, when I have ticked off all of the attributes on my list, I will either be finished or have a very, very good idea of what last few steps are needed to take me home. Which is basically what the Rembrandt quote above means.
As this is a wellworn painted jerrycan, we'll start with an aluminum base. I used this aluminum base texture from CGTextures:

This particular aluminum texture deserves some kind of Most Valuable Player award. I have come across it in many, many texture artists' Image Manager. Even if it doesn't tile, it a very useful image. It has enough details to make it interesting and not enough strong details to make it jarring. As it is a white metal, it can be used as a base for a lot of different metals. And finally it resides on the very popular site CGTextures.
So my bottommost layer consists of this aluminum base. In UV view I did a quick Paint Through job with Repeat turned on to cover the entire object. Then I painted out the seams in Ortho view - also using the Paint Through tool and our chosen aluminum texture. So far, so good:

Right click on your layer and add a Layer Mask for the selected layer, which you set to Reveal All. Now with the Layer Mask selected still, choose the Paint tool, set your paint colour to black and pick a suitably organic brush to paint scratches with. You want to paint in all the places where the paint has worn off the can (as well as the rubber hose, where no paint should be found). Picking a suitable brush - or combinations of brushes - is half the work. To help you get that flaky look of peeling paint, you could enlist the services of the brilliant Fractal Noise Mask. Find it under the Projection palette. First tick Mask Preview Enabled in Projection Settings, so you can see what your settings will look like before you start painting.

Then turn on Fractal Noise Mask a bit further down, crank the Mask Amount up to 1.0 and set the size to something suitably small like 0.059 or smaller still. Feel free to play with the Roughness and the other settings till you have a look you like.


But green paint doesn't stay exactly the same shade of green for very long. We need to get some different details into the green paint to make it more believable; Break it up and create some variation. So pick the colour of your paint and change its value and saturation a bit. Grab your Paint tool and pick a good broken up and organic brush. I used primarily the Iguanadon brush (under Brad's New Brushes when you hit K). But you want to use a few different brushes at reduced opacities to make sure we don't get too obvious patterns. This is what I have (flat lighting):

While we are still detailing the paint work of the jerrycan, why not paint in a decal to both give it some visual interest and further tell the story that this is a military object. I prepared a few stencil style decals in another paint package:

Stamping the decal images with the Paint Through tool onto a layer above the green paint layers is very simple. But as a former Lead of mine always used to say, 'you have to work in your brush strokes!' What that means is, it would ruin the illusion if we just let these stencils sit undisturbed on top of the paint layers. That layer of spray paint would start getting worn away very quickly - if it even was 100% opacity to begin with. So use the Paint tool, set the Painting Mode to Clear (or if you want the gold star for non-destructive workflow do so by giving the Layer a Layer Mask and painting into that with black) and pick a soft brush with low opacity. Here are my decals after a little bit of work (in flat lighting and on a 50% grey background for clarity):

All told, that takes our layer stack up to something like this:

Generally, you want to be careful with Ambient Occlusion in your textures, as it bakes in lighting information into the textures - which really should be the domain of the shader and lighting to add such details. But in reality, you do find a small number of instances where texture artists (and lighters for that matter) talk about "helping the shader along" with things like Ambient Occlusion and painting lighter edges on assets for example. But perhaps that is a topic for a different day. For now, let's just state that Ambient Occlusion rendered out as masks can be massively helpful for a number of things.
To generate Ambient Occlusion for use in your textures, select your object (if you don't already have it selected), go to the Objects menu and select Ambient Occlusion. This will get Mari to start calculating the Ambient Occlusion. Then add a procedural layer (Geometry - Ambient Occlusion) and change the blend mode to Multiply and opacity to something like 0.350. If you want a gold star, throw on a Layer Mask and break up the AO to add variety.
This is what my layer stack looks like so far (with flat lighting):


Too flat. We need some detail in there. Pick a lighter colour (I used 0.153 0.156 0.157 in RGB values), and with your Paint tool and a nice broken up brush (could be crackSplat from the Hard Surface Brushes tab) set on low opacity (0.3 or there abouts) add in some variation to our rubber base. The aim is variation in the colour along the lines of a mottled pattern:

Better. Now let's use the wonderfully organic pattern of the aluminum base underneath. Change the blend mode of your rubber base layer to Multiply. Okay, that is looking decidedly a lot more like a black rubber hose:

But we can do better still. We need more detail to sell the look of rubber. Add another layer to sit above the rubber base. Grab yourself a concrete texture from CGTextures or Texture Pilot. Then using the Paint Through tool and a broken up brush (like crackSplat) to paint some of the concrete onto your layer like this:


Remember that nice concrete texture from before? We need to employ that again to add some general dirt to our jerrycan. Add another layer and set the blend mode to Overlay and the opacity to something in the vicinity of 0.266 (these values are not set in stone, so feel free to play around with them, to match the concrete texture you are using and the look you are going for.). Now using the Paint Through tool and a brush like Linear (found under the Basic Brushes tab when you hit the hotkey K) use your concrete texture to paint more varied and detailed dirt onto your can. I should point out, as a matter of course, that you want to have your Edge Mask switched on, to avoid streaky paint on your edges (find it in your Projection palette):

This is what I have so far:

This jerrycan is meant to have taken a fair bit of abuse. Metal like aluminum naturally gets scratched under such circumstances - particularly on the edges and corners of the object. Hunt down a couple of suitable metal scratch textures. This is what I used:


Add a layer for your rust and give it a Layer Mask (set to Reveal All for now). Using the Paint Through tool paint the rust onto your can where the paint is peeled back and has exposed the metal underneath. You are only as good as your reference, so do have a look at how and where rust gathers on similar objects.


What other details do we need? If this can is used for gasoline, it would be reasonable to imagine that some of the gasoline would spill and drip onto the can from time to time. Such a stain would again attract dust and other dirt, which would stick to the gasoline drips. Let's try and create a stain like that.
Add another layer for our spills. Find a suitable texture with streaky stains on. This is what I used:

Nice organic streak details with variety in colour and value.


I want to give it a slightly grainier look. I could have employed the Fractal Noise Mask set on a really small size for this, but instead I am going to use a filter. Filters menu - Add Noise. Don't tick the Grayscale box - we don't mind the extra bits of colour variation. Set the size to something suitably small like so:

Apply that filter to your Current Paint Target (which should be the dust layer you have selected). You should have something looking like this:


At the end of any project, it is worthwhile to look back and go over the steps you took. There is still a lot of things you could add to, or subtract from this colour map. Personally, I think I could have been more subtle with the peeled off paint; The green paint is maybe a tad oversaturated in places etc.
There are no revolutionary new techniques in this workflow; This is a pretty standard and straight forward bread and butter approach for a texture artist. But in order to return to Rembrandt, the powerful and flexible layer system of Mari, allows us to keep adding in details until everything has been revealed.
This tutorial continues with a look creating spec maps for our jerry can here.
Did you find this useful? Leave me a comment, share the post via your favourite social media or drop me an email about things you'd like to see covered.
No comments:
Post a Comment